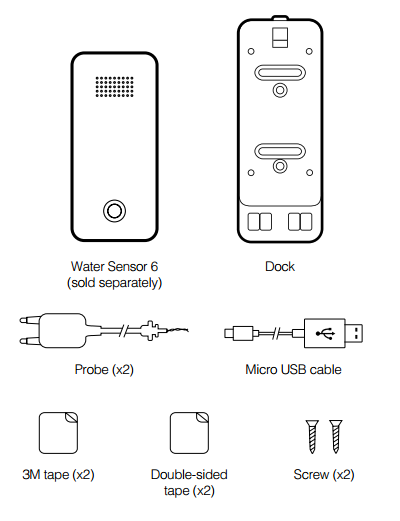
Aeotec Dock for Water Sensor 6.
Aeotec Dock for Water Sensor 6 has been crafted to be used with Aeotec Water Sensor 6 as an extension device.
Dock contains no Z-Wave functionality, so it does not need to be setup or customized within your Z-Wave home control system. While Water Sensor 6 has Z-Wave capabilities, should you not have configured Water Sensor 6 to be a part of your Z-Wave system, please refer to Water Sensor 6 user guide to continue.
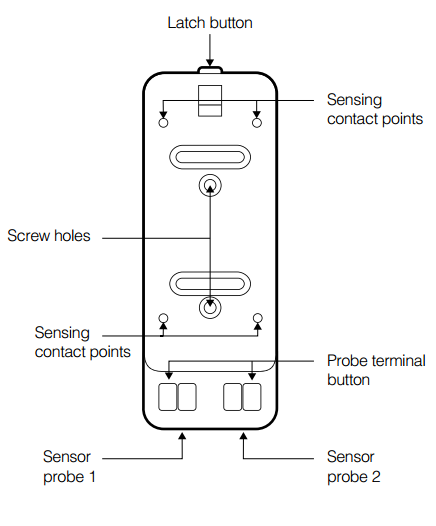
Familiarize yourself with your Dock for Water Sensor 6.
Dock for Water Sensor 6 has the following elements;
Optimally placing Dock for Water Sensor 6.
Dock provides a number of advantages for Water Sensor 6. To optimally install it, please note the following;
While Water Sensor 6 is waterproof, Dock is not. Ensure that Dock is installed in a location that it will not be exposed to water in the event of a leak or flood.
If using the USB power, make sure that the distance between the location and the adapter is no farther than the USB cable.
Installing Dock further off the ground and away from large metal objects, such as fridges, can optimize the wireless performance of Water Sensor 6.
The Probe’s wire length is 1 meter. Before affixing Dock to a surface, ensure that the distance to the desired location is no more than 1 meter.
Quick start.
The following will step you through installing Dock and connecting Water Sensor 6 to it.
Select installation location for Dock and Probe(s) after reading the previous section “Optimally placing Dock for Water Sensor 6”. Ensure that all cable lengths are suitable.
Stick one Probe to the selected location with waterproof 3M tape. To detect the presence of water, Probe’s two prongs should sit flat against the surface where water may potentially leak. To detect the absence of water, Probe’s two prongs should sit at the minimum possible water level.
If desired, install a 2nd Probe following steps 1 and 2.
Install Dock in the selected location using screws or double-sided tapes.
Press and hold either of the two Probe terminal buttons, insert Probe wires to the ports, and then release the Probe terminal buttons. Repeat this step if installing the 2nd Probe.

Press and hold Latch button,and then mount Water Sensor 6 into Dock.
If choosing to power Water Sensor 6 via USB cable.
Insert the provided USB cable into the USB port on Dock.
Insert the opposite end of USB cable into a USB power adaptor capable of providing a minimum of 5VDC, 1A.
Dock for Water Sensor 6 setup is now complete.
Important safety information.
Please read this and other device guides carefully. Failure to follow the recommendations set forth by Aeotec Limited may be dangerous or cause a violation of the law. The manufacturer, importer, distributor, and/or reseller will not be held responsible for any loss or damage resulting from not following any instructions in this guide or in other materials.
Dock for Water Sensor 6 is intended for indoor use in dry locations only. Do not use in damp, moist, and / or wet locations.
Contains small parts; keep away from children.