Aeotec Panic Button.

Aeotec Panic Button has been crafted to power connected lighting using Z-Wave. You can find out more about Panic Button by following that link.
To see whether Panic Button is known to be compatible with your Z-Wave system or not, please reference our Z-Wave gateway comparison listing. The technical specifications of Panic Button can be viewed at that link.
Get To Know Your Panic Button.
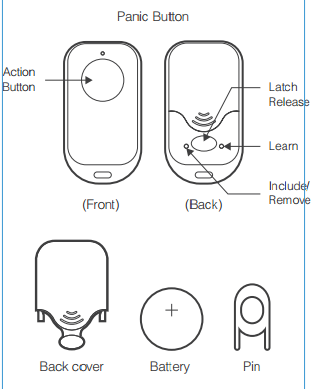
Package Contents:
- Panic Button
- Battery
- Pin
Your Panic Button has one button which can be used to control scenes as a secondary controller, or control Z-Wave Dimmers and Switches directly.
Group Mode will allow the Panic Button to directly program a switch or a dimmer device using its button and directly control them without a gateway or controller in between. This is set by default under Use Mode (Parameter 250 [1 byte] = 0).
Scene Mode will forward a Scene ID to your gateway, the gateway will process the command which you can use to control a scene or event in your existing network. This can be set by setting Parameter 250 [1 byte] = 1. Not all gateways will work with this type of command.
Quick start.
The first step to setting up your Panic Button is to power it up.
-04.png?1443436839)
Panic Button can be used as a remote control within an existing Z-Wave network, or can act as the main controller for a Z-Wave network that has no software controller or gateway.
To begin the setup process, you first need to insert Panic Button’s battery.
Remove Panic Button’s back cover by pressing Latch Release.
Insert the provided battery.
Replace the back cover.
From here, there are 2 different ways to set Panic Button up; adding Panic Button to an existing Z-Wave network, and creating a new Z-Wave network with Panic button as the main controller. Those steps are elaborated in two separate sections further in this guide. Please follow either of those 2 sections in this guide as desired.
If you already have an existing Z-Wave network (Panic Button as secondary controller).
During the following steps, your Panic Button should be in close to your primary Z-Wave controller. This is likely to be a gateway or hub.
1. Put your primary Z-Wave controller into inclusion mode. If you’re unsure of how to do this, refer to the part of its user manual that describes adding new Z-Wave devices to your network.
2. Press the Learn button on your Panic Button with the pin or press the bottom- right action button. Your Panic Button’s green light will begin to pulse.
Panic Button is now a part of your Z-Wave home control system.
It is possible for Panic Button to directly control a device or a group of devices without communicating via your Z-Wave gateway. To directly control devices on or off, please follow the instructions in the “Create direct on / off control.” section of this guide. To directly control a group of devices without communicating via your Z-Wave gateway, your gateway must support such Z-Wave’s scene control functionality. Where we are aware of gateways that support such functionality, we have noted it at http://support.aeotec.com/panicbutton/scene Should your controller not be noted, please contact your gateway or software maker’s support desk for further information.
Please skip to the ‘Change your remote’s mode’ section of this guide to continue.
If you need to create a new Z-Wave network.
Panic Button can be used to create a new Z-Wave network and in which Panic Button will serve in place of a Z-Wave gateway or control software. The following instructions will guide you through creating such a network where Panic Button can communicate with connected Z-Wave devices.
To create this network, you will connect Z-Wave devices directly to Panic Button. These devices cannot be a part of an existing network and may have to be factory reset if they have been previously used.
Quickly press Include/Remove on back of Panic Button with provided Pin.
Press the join network / Action Button on the Z-Wave device that you want to add to Panic Button’s network. If you are unsure which button to press, please refer to the Z-Wave product’s instruction manual.
When the Z-Wave product successfully joins Panic Button’s network, Panic Button’s LED will flash green slowly and then turn solid green for 2 seconds. Should the LED continue to flash green for a further 30 seconds before turning off, the Z-Wave product has been unable to connect to Panic Button; repeat the above steps and please contact us for further support if needed.
Repeat step 2 to connect any other devices you would like to add into the network.
Once finished, press Panic Button’s Action Button to exit Include/Remove mode.
You have now created a Z-Wave network in which Panic Button serves as the main controller. You now need to program Panic Button’s specific control of these devices.
Creating a scene to control.
Before giving your Panic Button control over other Z-Wave devices, it’s important to understand how many scenes each button can control. A scene is a grouping of multiple devices on your Panic Button is capable of controlling multiple devices (aka a scene) with the push of a single button.
If you set your Panic Button up as a primary controller in the previous steps by creating a new network, the button is capable of controlling 1 individual scene for dimming all lights or controlling all programmed switches on or off at the same time.
If you added your Panic Button to an existing Z-Wave network, it can control either 1 or 2 individual scenes for its button. The distinction here is whether your Panic Button is Use (Group) Mode or in Use (Scene) Mode. In Use (Group) Mode, you can control 1 scene from its button. In Use (Scene) Mode you can control 2 different scenes from its button.
The following sections give directions on creating scenes relative to how your Panic Button is setup.
Your Panic Button as a primary controller.
In this mode, scenes which your Panic Button can control will need to be manually programmed.
Please refer to the ‘Selecting which devices to control’ section of this guide for a step-by-step instruction on how to do this.
Your Panic Button is a secondary controller.
By default your Panic Button, when added to an existing network, is in Use (Group) Mode. To change the mode please refer to the ‘Setting your Panic Button’s use mode’ under the ‘Advanced Function’ section of this manual.
Your Panic Button is in Use (Group) Mode.
In order to program each button of your Panic Button, please refer to the ‘Selecting which devices to control’ section of this guide.
Your Panic Button is in Use (Scene) Mode.
In this mode, your Panic Button communicates directly with your Z-Wave network’s primary controller, generally a gateway or hub. By pressing each scene button, your Panic Button will send out a scene ID telling the primary controller to activate customized scenes that need to be setup via your controller’s interface. Please refer to your primary controller’s user manual for instructions on how to program individual scenes and how to activate these with your Panic Button.
Using your Panic Button.
With your Panic Button now setup, it’s time to use it. That’s as simple as pushing a button to activate or deactivate scenes. If your Panic Button is in Use (Scene) Model, the following table illustrates the button presses your remote will understand in order to control 2 different scenes with its button.
Advanced functions.
Adding devices to your Z-Wave network.
Panic Button can be used to create a new Z-Wave network and in which Panic Button will serve in place of a Z-Wave gateway or control software. The following instructions will guide you through creating such a network where Panic Button can communicate with connected Z-Wave devices.
To create this network, you will connect Z-Wave devices directly to Panic Button. These devices cannot be a part of an existing network and may have to be factory reset if they have been previously used.
Quickly press Include/Remove on back of Panic Button with provided Pin.
Press the join network / Action Button on the Z-Wave device that you want to add to Panic Button’s network. If you are unsure which button to press, please refer to the Z-Wave product’s instruction manual.
When the Z-Wave product successfully joins Panic Button’s network, Panic Button’s LED will flash green slowly and then turn solid green for 2 seconds. Should the LED continue to flash green for a further 30 seconds before turning off, the Z-Wave product has been unable to connect to Panic Button; repeat the above steps and please contact us for further support if needed.
Repeat step 2 to connect any other devices you would like to add into the network.
Once finished, press Panic Button’s Action Button to exit Include/Remove mode.
You have now created a Z-Wave network in which Panic Button serves as the main controller. You now need to program Panic Button’s specific control of these devices. To do this, please follow the instructions in the “Selecting which devices to control.” section of this guide.
Removing devices from your Z-Wave network.
Your Panic Button is capable of removing devices from your Z-Wave network when it is either your network’s primary controller or your network permits your Panic Button, as a secondary controller, to permanently remove devices.
1. Press your Panic Button’s remove button. Your Panic Button’s red light will pulse slowly.
2. Press the Z-Wave button on the device that you wish to remove. If you’re unsure of how to do this, refer to its user manual.
3. If the removal is successful, the green light on your Panic Button will stay lit for 2 seconds and then its red light will blink. Otherwise, the red light will stay lit for 2 seconds before again blinking.
4. Repeat step 2 for any other devices you wish to remove from your network. 5. Once you’re finished, press any button on your Panic Button to exit removal mode.
Selecting which devices to control.
Your Panic Button has two use modes, Scene Mode and Group Mode. When in Scene Mode, your select which devices your Panic Button can control by using your primary controller, generally a gateway or a hub.
If in Group Mode, you configure your Panic Button to directly control devices as follows;
1. Press and hold your Panic Button button that you wish to use to control a Z-Wave device. Do not release the button until step 4. Your Panic Button’s green light will blink rapidly when it’s ready for the following steps.
2. Press the Z-Wave button on the device that you wish to control. If you’re unsure of how to do this, refer to its user manual. If your Panic Button is able to control the Z-Wave device, its green light will stop blinking and remain solid for 2 seconds. If the Z-Wave device cannot be controlled, its green light will still keep blinking or its red light will blink only once when you short press the Z-Wave button.
3. Before you release the button, you must determine what you want it to do.
a) If the Z-Wave device that you want to control is ON when you release the button, it will toggle the Z-Wave device on and off.
b) If the Z-Wave device that you want to control is OFF when you release the button, it will only allow you to turn the Z-Wave device off.
If the Z-Wave device that you want to control is at a PERCENTAGE (ie. 20%, 35%, 70% power) when you release the button, it will allow it you toggle the Z-Wave device between that percentage and off
4. Release the button you held down in step 1.
5. Repeat the steps above if you wish to control more Z-Wave devices from your Panic Button. You can add multiple devices to each button in order to create a scene. You can add up to 40 Z-Wave devices to each button.
Removing devices from a scene button.
To remove devices from this network, you will unpair Z-Wave devices directly from Panic Button.
Press and hold the Include/Remove on back of Panic Button with provided Pin until its LED flashes red rapidly.
Press the Action Button on the Z-Wave device that you want to remove from Panic Button’s network. If you are unsure which button to press, please refer to the Z-Wave product’s instruction manual.
When the Z-Wave product successfully unpairs from Panic Button’s network, Panic Button’s LED will flash red/green rapidly for 1-2 seconds and then turn solid green for 2 seconds before returning to a flashing red LED.
Repeat step 2 to remove any other devices you would like to unpair from the network.
Once finished, press Panic Button’s Action Button to exit Include/Remove mode.
Resetting your Panic Button.
Your Panic Button can be reset to default factory settings with ease.
1. Press and hold the Learn button for 20 seconds with a pin.
2. The green and red light will alternate for 20 seconds, then the green light will stay solid for 2 seconds to indicate a successful reset.
Setting your Panic Button into use/scene mode (secondary controller).
Each brand of Z-Wave gateway / hub has its own unique method for setting your Panic Button's user mode as a Group or Scene controller. Please refer to your gateway’s user manual for detailed instructions on this. In some cases, you will need to utilize the technical parameter settings available in your Panic Button.
Parameter 250 [1 byte] = 1
1. Go to the parameter settings page, specific to your Panic Button, within your gateway’s user interface.
2. If it does not already exist, add a new row or column to add Parameter number 250.
3. Set the size of the parameter to be 1 byte.
4. Set the value in order to place your Panic Button into Group or Scene Mode. Group Mode has a value of 0, Scene Mode has a value of 1.