At the time of publishing, Vera is not automatically compatible to Door / Window Sensor 7 Pro or the basic version of that sensor. However, with a few simple tweaks compatibility can be established for the magnetic sensor.
This guide is an additional guide to the Door / Window Sensor 7 (Basic) user guide and Door / Window Sensor 7 Pro user guide. The basic and Pro models of Door / Window Sensor 7 described in those guides are the Z-Wave Gen7 editions of Aeotec's door and window sensor technology. Instructions for the version using Gen5 technology are available here.
Follow the below steps to add compatibility to your Door / Window Sensor 7. This will need to be done to all new Door / Window Sensor 7 added into your network.
1. Pair Door / Window Sensor 7 to your Vera gateway
- In the device page, select "+ Add Device".
- Select "Generic Device".
- Select "Next", and then "Next" again.
- You'll see a counter count down waiting for you to pair a new device. On your Door Window Sensor 7, remove the cover and then tap the tamper switch 3x times to pair Door Window Sensor 7.
2. Ensure 1 or 2 nodes load up, it should be:
If Door Window Sensor 7 Pro
[Name of Sensor given by you, in my case it is called "DWS7Pro"] - Main Node
[_Motion Sensor] - Child Node
If Door Window Sensor 7 Basic
[Name of Sensor given by you, in my case it is called "DWS7Pro"] - Main Node
Tap its tamper switch once after it is paired to update its battery level. Once tapped, the battery icon should appear over the main node.
3. Select the arrow on your named device ["DWS7Pro" in my example]

4. Click on "Advanced"
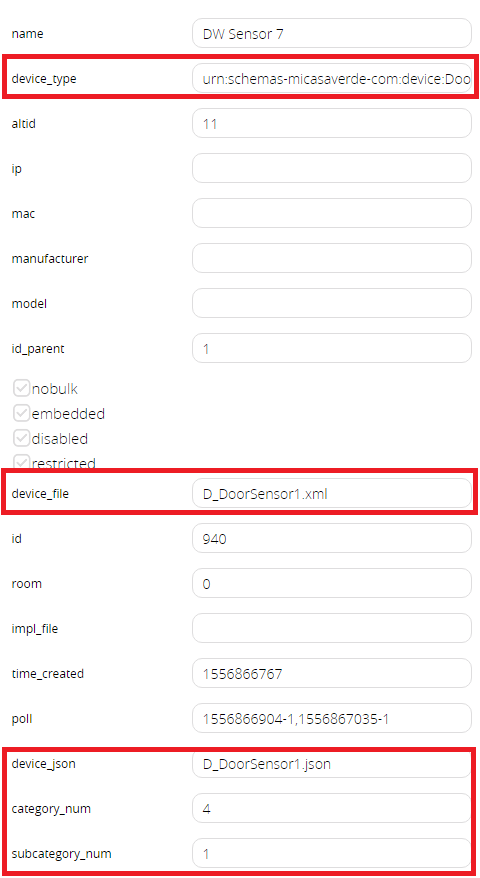
5. On the new page, make these changes:

6. Go to Settings -> Z-Wave Settings, then "Advanced" tab.


