This article will give you direct steps on how to run Home Assistant OS through VirtualBox on Windows, and how you can passthrough the Z-Stick to interface it into Home Assistant and ZWaveJS. This will serve as a partial guide to getting your Z-Stick running with Home Assistant on your Windows PC from top to bottom.
There will be 4 sections to follow to complete your very own Home Assistant OS from your Windows PC.
1. Download and install VirtualBox.
2. Setup Home Assistant in VirtualBox.
3. Starting Home Assistant in VirtualBox.
4. Passthrough Z-Stick through VirtualBox.
This guide was created with:
- VirtualBox 7.0
- V7.0.6 r155176 (Qt5.15.2)
- Windows 11 V10.0.22621
Download and install VirtualBox.
1. Download Virtual Box here for "Windows Hosts": https://www.virtualbox.org/wiki/Downloads
2. Open up the .EXE installer
3. Install Virtual Box into the folder that you want it to be by following the Virtual Box Setup Wizard.
Setup Home Assistant in VirtualBox.
1. Download Home Assistant OS for Virtual Box (.vdi) here: https://www.home-assistant.io/installation/windows/
2. Place it into a folder that you'd like the operating system to remain in permanently (ie. C:\HAOS)
3. Open up VirtualBox
4. Click on "New"

5. Input:
Name: <Whatever you like here> (I use HAOS)
Folder: <The folder you want the virtual machine to run from> (ie. C:\HAOS)
Type: Linux
Version: Other Linux (64bit) (scroll to the very bottom for this).
Then click on Next.

6. Input:
Base Memory: <Minimum 2048MB> *I like to add at least 4GB worth
Processors: <Minimum 1> *I like at least 2 CPU
Then click Next.

7. Click on "Use an Existing Virtual Hard Drive File"

8. Choose the "haos_ova-10.3.vdi" file, then click Next. (use the file downloaded from step 1)
9. Click on Finish
10. Right-click on HAOS your new Virtual Machine and click on Settings (or click on settings on the toolbar at the top):

11. Go to "System" and checkmark "Enable EFI (special OSes only).

12. Click on the Processor tab at the top
13. I would recommend:
Processors = 2 (you can max it out if you like, not further past the green bar).

14. Go to Network (from the lefthand toolbar).
- Checkmark Enable Network Adapter
- Set "Attached to:" to Bridged Adapter

15. Click OK at the bottom.
Congrats, you now have a Home Assistant OS running in Virtual Machine. Continue forward to get started.
Starting Home Assistant OS in VirtualBox.
1. Click on your Home Assistant Virtual Machine to highlight it, then click on Start (green arrow at the top).

2. This will boot up a virtual machine screen and will show that your Home Assistant is booting up, give it about 5 minutes.

Note - If your mouse gets stuck in your Virtual Machine, just press "CTRL + ALT + DELETE" to access Task Manager, and then close Task Manager out.
3. It is done once Home Assistant is done booting up completely (see screen below), it will give you the correct URL to access Home Assistant through any chosen web browser (ie. Chrome, FireFox, etc).

4. Open up a Web Browser, then input "http://homeassistant:8123/" which will typically be the default hyperlink that will allow you to access Home Assistant at any point in time. The CLI Screen will tell you the specific local hyperlink you'll be using.
5. Give it a few minutes to load up in your Web Browser, and Home Assistant will ask you to create your username and password that you'll use to login into Home Assistant.
Passthrough Z-Stick through VirtualBox.
You may need to install the VirtualBox Extension found here before you can pass through the Z-Stick Gen5 or Z-Stick 7 to your Home Assistant setup: https://www.virtualbox.org/wiki/Downloads
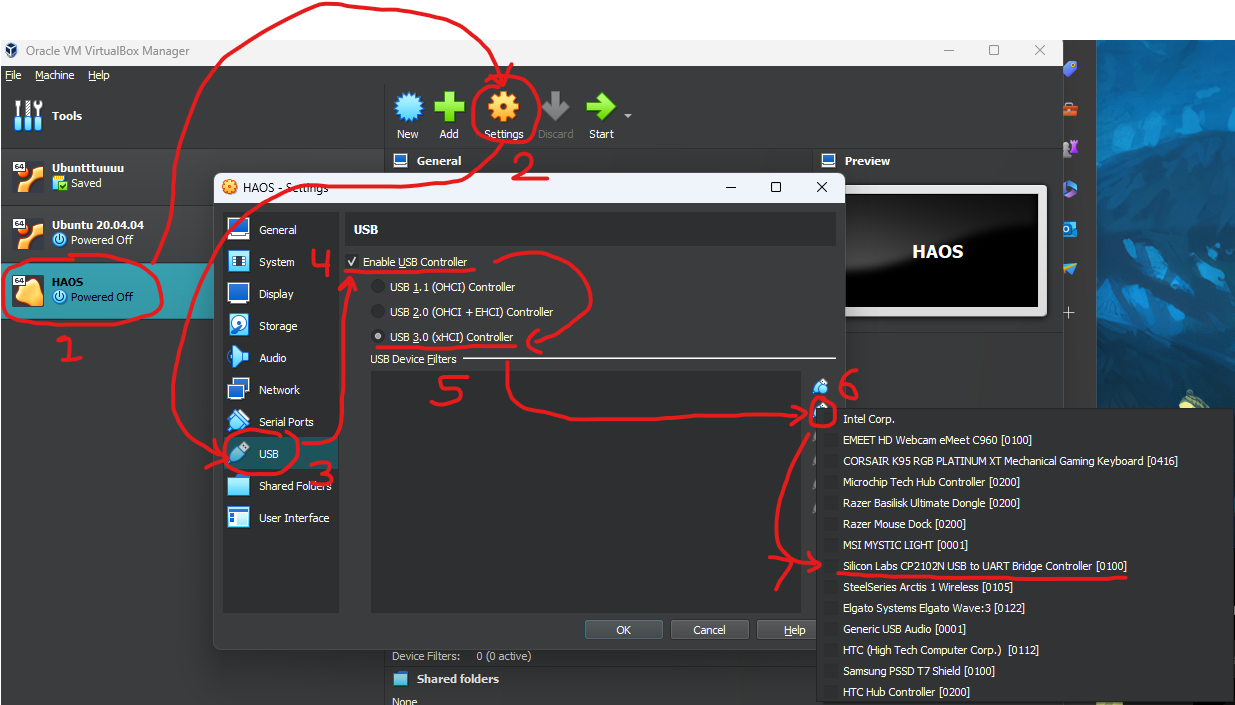
Method 1 - Setup Z-Stick passthrough before booting up Home Assistant.
1. Open VirtualBox


Method 2 - When Home Assistant is already running.
1. On your Virtual Machine interface click on "Devices" on the upper toolbar.
2. Click on USB
3. Then select
If Z-Stick 7, select "Silicon Labs CP2102N USB to UART Bridge Controller [0100]"

If Z-Stick Gen5, select "Sigma Designs, Inc."

4. You are now done with the initial setup, you can now follow the guide found here to further setup ZWaveJS UI in Home Assistant: Setup Home Assistant with Z-Stick 7 and ZWaveJS UI
