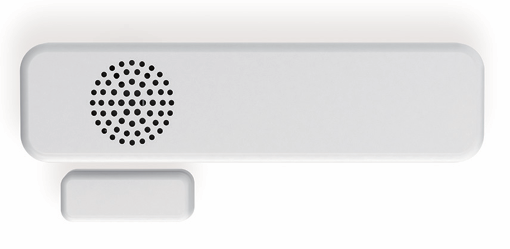
Aeotec Door / Window Sensor 8 was developed to record the condition of doors or windows with Z-Wave Plus. It is powered by Aeotec’s Gen8 technology and S2 framework. You can find out more about Door / Window Sensor 8 Basic by following that link.
To see whether Door / Window Sensor 8 is known to be compatible with your Z-Wave system or not, please reference our Z-Wave gateway comparison listing. The technical specifications of Door / Window Sensor 8 can be viewed at that link.

Package contents:
- Sensor Unit
- Cover
- Mount
- Magnet
- Large Adhesive Tape
- Small Adhesive Tape
- 2x Screws
- 2x Wall Anchors
Button Functions.

The Environment Sensor must support the following button functions.
| Push Type | Function | Description |
| Initial Power Up (Outside Network) | SmartStart Pairing | SmartStart:During this time, Door/Window Sensor 8 will send inclusion requests for SmartStart Learn Mode.
|
| Initial Power Up (Inside Network) | 1. Wakeup Report 2. Reports all Sensor Data | Wakeup and Send All Sensor Reports: Door/Window Sensor 8 will inspect itself for new temperature and humidity data, it then send a Wakeup Notification and then all sensor data, sensor will remain awake for 15 seconds.
|
| Short Press | 1. Quick Exit Inclusion or Exclusion mode. 2. Network Status | Exit Classic Inclusion or Exclusion: If Door/Window Sensor 8 is in inclusion or exclusion mode, inclusion or exclusion would immediately stop and go into standby mode. Wakeup Report:A wakeup report will be sent to the Z-Wave Controller/hub and allow any queued commands to be sent to the Door/Window Sensor 8.
|
| 2x Button Tap | Classic Inclusion or Exclusion | Classic Inclusion/Exclusion: Used to pair or unpair the Door/Window Sensor. Exclusion can be done regardless if the sensor is paired or not.
|
| Long Press/Hold between 3 to 5 seconds. | Reports all Sensor Data | Reports all Sensor Data: When action button is released between 3-5 seconds, all sensor data including battery report will be sent to the Z-Wave Controller/hub.
|
| Long Press/Hold >12 seconds | Factory Reset | Factory Reset:Initiates "Device Reset Locally" causing the sensor to be removed from the hubs software and factory reset itself.
|
Important safety information.
Please read this and other device guides carefully. Failure to follow the recommendations set forth by Aeotec Limited may be dangerous or cause a violation of the law. The manufacturer, importer, distributor, and/or reseller will not be held responsible for any loss or damage resulting from not following any instructions in this guide or in other materials.
Keep the product and batteries away from open flames and extreme heat. Avoid direct sunlight or heat exposure. Always remove all batteries from products that are being stored and not used. Batteries may damage the appliance if they leak. Do not use rechargeable batteries. Ensure correct polarity when inserting the batteries. Improper battery use may damage the product.
Door / Window Sensor 8 is intended for indoor use in dry locations only. Do not use in damp, moist, and/or wet locations.
Quick start.
Getting your Door/Window Sensor 8 up and running is as simple as installing it and linking it to your Z-Wave network. The following instructions tell you how to add your Door/Window Sensor 8 to your Z-Wave network using an existing gateway.
Power Door Window Sensor 8.
Door/Window Sensor 8 has a battery tab in this unit to keep the unit from utilizing the battery when it is first purchased. Make sure that you remove this tab before you continue with the installation.
1. Slide the back cover out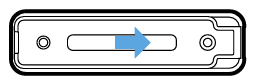
2. Lift the back cover up

3. Pull the battery tab out which should cause the battery to connect.


4. Door Window Sensor 8 is now ready to be paired to any compatible Z-Wave Controller.
USB vs. Battery power when pairing.
How you power your Door / Window Sensor 8 during the pairing process determines how it functions within your Z-Wave network.
Powered via USB: When paired while powered on USB, the sensor will act as an always-listening device and use the battery as a backup power source in case of a power outage. (Note: The sensor will not conserve battery or go to sleep if it is later removed from USB power).
Powered via Battery: When paired on battery power, the sensor gets paired as a Z-Wave sleeping device, allowing it to only communicate while being woken up. This helps the sensor conserve battery power and only use power when reporting or waking up for queued configurations.
Verifying USB power status.
You can confirm whether your Door / Window Sensor 8 is successfully receiving USB power by observing its LED behavior when the cable is plugged in or unplugged.
When unpaired: Upon connecting to USB power, after about 1 second, the Yellow LED will light up for roughly 1 second. It will then return to its ready state, indicated by a breathing Green LED.
When paired: Upon connecting or disconnecting USB power, the Red LED will blink quickly to indicate the hardware has registered the power change.
Using an existing gateway to pair.
This section will go over brief steps to connecting Door/Window Sensor 8, for further details on connecting this product to your hub, click on the hub that you have to access more detailed steps.
Initiate classic pair mode with Door Window Sensor 8:
 Quick Press the button twice (2x times) within 1 second while your hub is in pair mode - the green LED will flash fast when the sensor is attempting to include/pair or exclude/reset (depending on what mode your z-wave controller is in).
Quick Steps for Pairing Door / Window Sensor 8.
- Aeotec AutoPilot:
- Open up AutoPilot UI
- Click on "DEVICES"
- Click on "+ Add new"
- Click on "+"
- Click on "+ Add"
- Now tap the Action Button 2x times within 1 second on your Door/Window Sensor 8.
- Aeotec Smart Home Hub / SmartThings:
- Open SmarThings app.
- Tap + (at the top right corner).
- Tap "Add device"
- Tap Scan Nearby.
- Now tap the Action Button 2x times within 1 second on your Door/Window Sensor 8.
- Click on "Setup" when the new device appears.
- Scan the QR code, or choose to enter the 5-digit DSK code.
- Home Assistant / Z-WaveJS:
- Open up Home Assistant
- Click on "Configuration" at the bottom left of the page.
- Click on "Integrations".
- Click on "Configure".
- Click on "ADD NODE".
- Click on "START INCLUSION"
- Now tap the Action Button 2x times within 1 second on your Door/Window Sensor 8.
- SmartStart QR code scanning:
- If your Z-Wave gateway supports SmartStart, you can scan the QR code on the Door/Window Sensor to automatically pair the sensor if your Z-Wave hub supports this.
- You can set your hub into SmartStart pair mode, then power up the Door/Window Sensor 8 to automatically pair the sensor
- For most other hubs:
- Set your Z-Wave hub to connect new Z-Wave devices.
- Tap the Door/Window Sensor 8 tap the Action Button 2x times within 1 second.
- If prompted, scan the QR code or enter the 5 digit DSK code.

Door/Window Sensor 8 utilizes double-sided adhesive tape to allow you to mount Door/Window Sensor 8 onto any flat surface.
Make sure to double check if your sensor can communicate with your hub before you permanently install your sensor with double-sided tape or screws. (If you need to install it in a specific location and it won't communicate, you will need an additional Z-Wave Repeater).
- Place the double-sided adhesive on the bottom of Door/Window Sensor
- Choose a place to stick Door/Window Sensor and firmly press down to finish the mounting installation.
- Ensure that the magnet is aligned with the marks of the backplate.
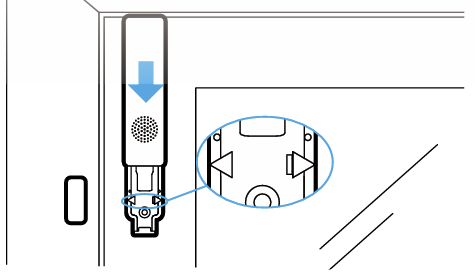
If you require the use of Tilt status, you must place the main body of the sensor where the body shifts roughly 5 degrees:

Wakeup Report.
This device is battery operated and utilizes a deep sleep state most of the time to save battery life. Communication with the device is limited. In order to communicate with Door/Window Sensor, a Z-Wave controller is needed in the network.
This device will wakeup regularly and report a wakeup state by sending out a Wakeup Report. The controller can then send out queued commands for the Door/Window Sensor to control it before it goes back to sleep.
If the device was included by a Z-Wave controller, the controller will usually perform all necessary configurations. The wakeup interval is a trade-off between maximal battery lifetime and the desired responses of the device.
Wakeup Door/Window Sensor:
- Tap the button once to Door/Window Sensor Sensor for 15 seconds.
Removing your Door/Window Sensor from a Z-Wave network (Exclusion).
Door/Window Sensor can be removed from your Z-Wave network at any time. You’ll need to use an existing Z-Wave network to do this and the following instructions which will tell you how to do this using your existing Z-Wave Network.
This method can be used with any Primary Z-Wave Controller even if it is not directly paired to Door/Window Sensor.
Using an existing gateway.
1. Place your gateway or controller into Z-Wave unpair or exclusion mode. (Please refer to your controller/gateway manual on how to do this)
2. Tap the button on Door/Window Sensor 2x times within 1 second.
3. Your gateway should confirm if Door/Window Sensor is successfully excluded from your network.
Manually Factory reset Door/Window Sensor.
This device also allows being reset without any involvement of a Z-Wave controller. This procedure should only be used when the primary controller is inoperable otherwise your controller will be left with a phantom node that does not exist.
Factory Reset Door/Window Sensor:
- Push the button of Door/Window Sensor for 12+ seconds.
Product Usage.
This device will start monitoring all air parameters once paired to your Z-Wave network. The measurement of air happens once every 15 minutes, while tapping the Tamper Switch once will force an immediate measurement and change indication based on the danger level.
Reported sensors.
Humidity: +/- 3 % on relative humidity, +/-1 %
- Default Activity:
- Humidity is checked every 15 minutes
- When checked, if the immediate humidity is +/- 5% RH change against the previous reported value, humidity is reported.
- If humidity does not change or get reported over +/- 5% RH after 43200 seconds (or 12 hours), it will report a new humidity value regardless of change.
- Settings affecting this report
- Parameter 1 [4 byte] = 900
- Parameter 3 [1 byte] = (Decimal Value*0.1 = Humidity)
- EU/US = 50 (or +/- 5.0% RH)
- Parameter 24 [4 byte] = 43200
Hysteresis Temperature: 0 ... 65 °C +/- 1 Kelvin
- Default Activity:
- Temperature is checked every 15 minutes
- When checked, if the immediate temperature is +/- 2.0C (EU) or +/- 3.6F (US) degrees of change against the previous reported value, temperature is reported.
- If temperature does not change or get reported over +/- 2.0C (EU) or +/- 3.6F (US) degree after 43200 seconds (or 12 hours), it will report a new temperature value regardless of change.
- Settings affecting this report
- Parameter 1 [4 byte] = 900
- Parameter 2 [1 byte] = (Decimal Value*0.1 = Temperature Threshold)
- US = 36 (or +/-3.6F)
- EU = 20 (or +/-2.0C)
- Parameter 24 [4 byte] = 43200
Dew Point: 0 ... 65 °C +/- 1 Kelvin (calculated from other sensor values)
- Updates a new report any time humidity or temperature reports a new value.
Battery Report:
- Voltage Level and Battery Level
- 2.90V or greater = 100% battery level
- 2.6V or less = 0% battery level
- Default Activity:
- Sends new battery report upon wakeup or power on.
- If battery level drops under 20%, then a battery report will be sent.
- Settings affecting this report:
- Parameter 23 [1 byte] = 20
Wireless Reports and Command Class.
The measured values of Humidity and Temperature are reported to your Z-Wave gateway, below are the primary command class used to report the sensor values.
Main command classes and descriptions.
Each command class will output specific values to your Z-Wave gateway, below is a brief sliver of information that should be displayed in your controller if it is supported.
Notification Report
Access Control (0x06)
0x16 = Open
0x17 = Closed
0xFE = Tilt
Home Security (0x07)
0x03 = Tamper Trigger
0x00 = Idle
Power Management (0x08)
0x00 = Issued when new battery replaced has more than 90% battery life.
0x01 = Power has been applied
0x02 = Power supplied by Battery
0x03 = Power supplied by USB
0x0B = Battery replacement needed
Heat Alarm (0x04)
0x00 = Overheat/Underheat alarm removed
0x02 = When overheat alarm detected (Parameter 14)
0x06 = When underheat alarm detected (Parameter 15)
Weather Alarm (0x10)
0x00 = Alarm removed
0x02 = Humidity greater than or equal to 95%, mold environment danger.
Binary Sensor V2
Door/Window (0x0A)
0x00 = Window/Magnet is in a closed state
0xFF = Window/Magnet is in an opened state
Tilt (0x0B)
0x00 = No Tilt
0xFF = Tilted
General (0x01)
0x00 = No Mold
0xFF = Dangerous Environment
Multilevel Sensor V11
Air temperature
Scale = Celcius
Precision = 1
Size = 2
Humidity
Scale = Percentage
Precision = 0
Size = 2
Dew point
Scale = Celcius
Precision = 1
Size = 2
Acceleration X
Scale = m/s^2
Range = 0 - 65535
Acceleration Y
Scale = m/s^2
Range = 0 - 65535
Acceleration Z
Scale = m/s^2
Range = 0 - 65535
Association Groups.
Group Association is a specific function in Z-Wave that allows you to tell Door/Window Sensor who it can speak to. Some devices may only have 1 group association meant for the gateway, or multiple group associations that can be used for specific events. This type of function isn't used too often, but when it is available, you may be able to use it to directly communicate to Z-Wave devices instead of controlling a scene within a gateway which can have unforeseen delays.
Some gateways have the ability to set Group Associations to devices that have these special events and functions. Typically this is used to allow your gateway to update the status of Door/Window Sensor instantly.
By default, your primary gateway should have been associated with Door/Window Sensor automatically during the pairing of your Siren. For any case you have a Secondary Z-Wave Controller, you'll need to associate it to your Door/Window Sensor in order for your secondary controller to update its status.
| Group Number | Description | Parameter # reference | Description |
|---|---|---|---|
| 1 | Lifeline | N/A | Assigned to the Z-Wave Controller/Hub: determines where it should send its standard reports to. |
| 2 | Control | N/A | Basic Set: Controls a device on or off along with the open/close status of the magnet. |
| 3 | Alarm | N/A | Notification Report: Send an alarm message when magnet is in an open state. |
| 4 | Tamper | N/A | Notification report: Sends alarm message when tamper alarm is triggered. |
| 5 | Tilt | N/A | Basic Set: Controls a device on or off along with the no tilt or tilt status. |
| 6 | Temperature High Trigger | 14 | Basic Set Issues an ON command when temperature detected is higher than the set value set in Parameter 14. |
| 7 | Temperature Low Trigger | 15 | Basic Set Issues an ON command when temperature detected is lower than the set value set in Parameter 15. |
| 8 | Humidity High Trigger | 16 | Basic Set Issues an ON command when humidity detected is higher than the set value set in Parameter 16. |
| 9 | Humidity Low Trigger | 17 | Basic Set Issues an ON command when humidity is detected is lower than the set value on Parameter 17. |
| 10 | Mold Danger | N/A | Notification Report Sends Alarm messages when mold danger is present. |
| 11 | Air Temperature | N/A | Multilevel Sensor Report Issues a temperature report to a Z-Wave Device that supports receiving external Z-Wave temperature reports. Useful for temperature control Z-Wave devices such as thermostats. |
There are further advanced parameter settings and group association settings which can be used with Z-Wave Controllers that allow control over them (some z-wave controllers will not have this capability). Below is the table you can use to further configure and customize your Door Window Sensor 8 if your controller supports that feature.
Here is the table of configuration parameters for the Aeotec Door Window Sensor 8:
| Parameter # | Byte Size | Description | Settings / Values | Value Description |
| 0x01 (1) | 4 | Set threshold Check Time | 0 30 ~ 65535 | Disable X Seconds (Minimum time is 30 seconds) |
| 0x02 (2) | 1 | Minimum temperature change to report | 0 1 ~ 255 | Disable 0.1 ~ 25.5 degree |
| 0x03 (3) | 1 | Minimum humidity change to report | 0 1 ~ 255 | Disable 0.1 - 25.5% |
| 0x04 (4) | 1 | Enable led indication (Bit field) | 0 ~ 63 (0x00 ~ 0x3F) | 0: Disable all indications. Bit 0: Periodic Reports (green) Bit 1: Wake up interval report (green) Bit 2: Mold danger alarm (red) Bit 3: Open/Close Status Change (red) Bit 4: Device Tampering (red) Bit 5: Acceleration reports (green) |
| 0x05 (5) | 1 | State when the magnet is closed | 0 1 | 0: Open when magnet far, Closed when magnet near 1: Closed when magnet far, Open when magnet near |
| 0x06 (6) | 1 | Group 2 trigger (Magnet status) | 0 1 2 | 0: Switch after magnet far away and magnet closed 1: Switch after magnet far away 2: Switch after magnet closed |
| 0x07 (7) | 1 | Command sent to Group 2 | 0 1 2 | 0: On 1: Off 2: On and Off |
| 0x08 (8) | 1 | Basic On of Group 2 | 0 - 255 | Value sent in case of On event |
| 0x09 (9) | 1 | Basic Off of Group 2 | 0 - 255 | Value sent in case of Off event |
| 0x0A (10) | 2 | Time delay of ON command | 0 - 32400 | Delay in seconds |
| 0x0B (11) | 2 | Time delay of OFF command | 0 - 32400 | Delay in seconds |
| 0x0C (12) | 1 | Sensor Limit Enable (Bit field) | 0 - 15 (0x00 ~ 0x0F) | 0: Disable Bit 0: Temperature upper limit Bit 1: Humidity upper limit Bit 2: Temperature lower limit Bit 3: Humidity lower limit |
| 0x0D (13) | 1 | Offset value for Mold danger alarm | 0 to 40 | The default Relative Humidity to trigger Mold danger alarm is 60%. |
| 0x0E (14) | 2 | Temperature Upper Watermark value | 1 ~ 1000 | 0.1 ~ 100 degrees (Send BASIC Set to Group 6 if exceeded) |
| 0x0F (15) | 2 | Temperature Lower Watermark value | -200 ~ 1000 | -20 ~ +100 degrees (Send BASIC Set to Group 7 if below) |
| 0x10 (16) | 2 | Humidity Upper Watermark value | 0 ~ 1000 | 0% ~ 100.0% (Send BASIC Set to Group 8 if exceeded) |
| 0x11 (17) | 2 | Humidity Lower Watermark value | 0 ~ 1000 | 0% ~ 100.0% (Send BASIC Set to Group 9 if below) |
| 0x12 (18) | 1 | High Temperature Trigger BASIC Set send | 0 ~ 255 | Basic Set Value sent to Group 6 |
| 0x13 (19) | 1 | Low Temperature Trigger BASIC Set send | 0 ~ 255 | Basic Set Value sent to Group 7 |
| 0x14 (20) | 1 | High Humidity Trigger BASIC set Send | 0 ~ 255 | Basic Set Value sent to Group 8 |
| 0x15 (21) | 1 | Low Humidity Trigger BASIC Set send | 0 ~ 255 | Basic Set Value sent to Group 9 |
| 0x16 (22) | 1 | Enable Binary Sensor Report | 0 1 | 0: Disable 1: Enable (For door, tilt, mold danger state) |
| 0x17 (23) | 1 | Low battery threshold | 10 - 50 | 10% - 50% (Report low battery when level goes under this threshold) |
| 0x18 (24) | 4 | Periodic Reports | 0 30 ~ 65535 | 0: Disable 30~65535: Seconds (Period for battery, temp, humidity, acceleration reports) |
| 0x19 (25) | 2 | Offset value for Temperature | -200 ~ 200 | -20.0 ~ 20.0 degrees (Scale defined by Param 64) |
| 0x1A (26) | 2 | Offset value for Humidity | -200 ~ 200 | -20.0 ~ 20.0 % |
| 0x1B (27) | 1 | Set tilt sensor mode | 0 1 2 | 0: Disable 1: Enable (Use with magnets; trigger >5°) 2: Enable (Use alone; trigger >5°) |
| 0x1C (28) | 1 | State of tilt in Mode 2 | 0 1 | 0: Open when tilted, Closed when not tilted 1: Closed when tilted, Open when not tilted |
| 0x1D (29) | 1 | Group 5 trigger | 0 1 2 | 0: Switch after tilted and not tilted 1: Switch after tilted 2: Switch after not tilted |
| 0x1E (30) | 1 | Commands sent to Group 5 | 0 1 2 | 0: On 1: Off 2: On and Off |
| 0x1F (31) | 1 | Basic On of Group 5 | 0 - 255 | Value sent in case of On event |
| 0x20 (32) | 1 | Basic Off of Group 5 | 0 - 255 | Value sent in case of Off event |
| 0x21 (33) | 1 | Tilt triggered angle | 1 - 90 | Adjusts the tilt triggered angle (Default: 5 degrees) |
| 0x22 (34) | 1 | Timeout of tilt detection (mode 1) | 5 - 60 | Seconds (Default: 5) |
| 0x23 (35) | 1 | Timeout of tilt detection (mode 2) | 5 - 60 | Seconds (Default: 8) |
| 0x24 (36) | 1 | Minimum acceleration change to report | 0 30 ~ 255 | 0: Disable 30~255: M/S2 |
| 0x40 (64) | 1 | Temperature & Dew Point Scale | 0 1 | 0: Celsius 1: Fahrenheit |